Table of Contents[Hide][Show]
- Three Reasons This Guide Works for Me
How to Create an Indoor Garden in 10 Simple Steps+−
- Step 1: Find a Space with Sunlight
- Step 2: Choose What to Grow Depending on Your Needs
- Step 3: Evaluate Your Plant’s Lighting Needs
- Urban Farming: A Return to Our Roots
- Step 4: Consider Temperature Where Plants Thrive Better
- Step 5: Get Creative with How You Grow Your Indoor Garden
- Step 6: Use or Make a Potting Mix of Well-Draining Soil
- Step 7: Choose Between Seeds or Seedlings
- Step 8: Mark Your Plants According to Feed Instructions
- Step 9: Mulch It Up to Maintain Moisture and Temperature
- Step 10: Harvest and Transplant as Necessary
- Is Vertical Farming the Future of Sustainable Food Sourcing?
- Make Your Home Green!
Three Reasons This Guide Works for Me
I’m beginning this article with a confession: I’ve never had a “green thumb.” In fact, I couldn’t keep plants or these green growers alive if my life depended on it, until, that is, I learned how to create an indoor garden.
This works for me for a few reasons:
- I forget about my plants, so unless they are right under my nose, I won’t remember to water them. (Thank goodness I don’t have this problem with my dog!)
- An indoor garden doesn’t require a lot of real estate or resources to start, unlike an outdoor garden where you need to have a huge outdoor space. All you need is an area you’re willing to devote to your garden and the natural light (or an artificial lighting system) to grow your leafy greens.
- It’s very rewarding, especially if you are like me and don’t inherently know how to grow anything. Whether just a handful of herbs in the kitchen or a vegetable and fruit garden somewhere else, growing your own produce can save you money in the long run. You’ll also feel more secure about what you’re eating—knowing you’re not consuming dangerous pesticides or purchasing produce that’s labeled “organic” only to learn it’s really not.
How to Create an Indoor Garden in 10 Simple Steps
If you’re considering your own indoor garden, here are the 10 steps to take to get yours thriving.
Step 1: Find a Space with Sunlight
If you don’t have a large yard, but you do have a windowsill, then you’re in luck! Any space with direct or indirect sunlight will work well.
Step 2: Choose What to Grow Depending on Your Needs
Once you’ve decided how much space you have for an indoor garden, determine what you’ll grow. Start by thinking about the things you need most often.
For example, do you find yourself running to the market or grocery store for fresh herbs or tomatoes often? Does your cooking or food prep require a certain ingredient, which, as a result, you always need to have on hand?
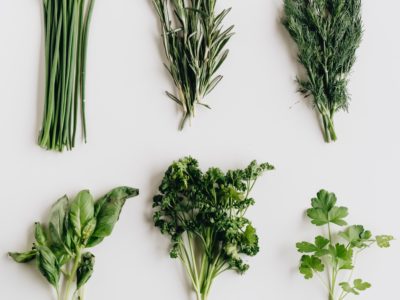
These are natural selections for your indoor garden. Maggie Villalobos, a 70-year-old woman who has maintained both an indoor and outdoor garden for nearly 45 years, says she focuses on growing herbs and vegetables in her indoor garden she needs most often.
For example, herbs like basil, mint, and cilantro are staples for Villalobos, along with occasional seasonal additions like figs.
Step 3: Evaluate Your Plant’s Lighting Needs
You need to think about how well your indoor plants will play together. Studies repeatedly find that natural sunlight is always best for most plants since it’s generally more powerful than artificial light or “grow lights.” It’s more equally distributed among the different wavelengths that help photosynthesis occur.
With that said, indoor lighting systems can make areas or dim apartments available for growing your herb garden. The New Seed Starters Handbook by Nancy Bubel quotes two university studies that tested fluorescent lights or bulbs for plant growth and found that fluorescent tubes, ideally a mixture of something like cool white and daylight or cool white and warm, provided the best results.
You can easily decipher light needs on plant tags with these rules of thumb:
- Direct light – Plants need at least six or more hours of sunlight hitting it directly per day.
- Moderate light – Houseplants need direct sunlight about four hours a day.
- Indirect light – Growing plants need to be out of direct sunlight; these plants are best for artificial lighting if you have areas you want to garden in that don’t receive a lot of sunlight.
- Low light – Plants need no direct sunshine and a little ambient light.
Related
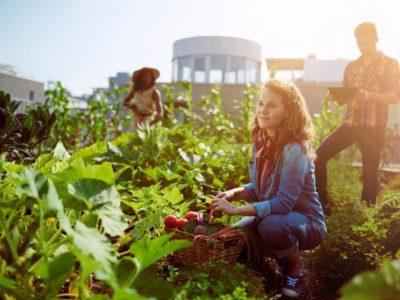
Urban Farming: A Return to Our Roots
You’re probably familiar with the concept of urban farming. Community gardens and farmers markets are popping up all over American cities and towns. People in these communities want this to be celebrated and encouraged so they have more accessible means to healthy food. And here’s a surprise…urban farming isn’t a new prospect; it’s a return …
Step 4: Consider Temperature Where Plants Thrive Better
Most plants grow best between 65 degrees and 75 degrees Fahrenheit. An occasional increase or decrease of 10 degrees or so is fine to continue strong growth.
If you keep your home warmer than 75 degrees on average, you may want to consider plants that do well in warm environments, like tropical and desert natives like salvia and succulents.
Step 5: Get Creative with How You Grow Your Indoor Garden
You can get pretty creative with this part. Got an old boot lying around? Or some vintage glass jars grandma gave you that you don’t know how to use?
They’re perfect for your indoor herb garden project! Find the containers you’ll use for each plant and judge based on a typical full growth size.
If you’re placing any of your growing plants in a wooden trough, on a table, windowsill, or other areas that can either be damaged, line the bottom with a shallow drip container to catch any excess water, or you’ll have quite a mess on your hands and possibly eroding flooring as a result!
Step 6: Use or Make a Potting Mix of Well-Draining Soil
Well-draining soil (which actually isn’t really “soil”) allows water to percolate through it a lot more quickly than garden soil and does not pool, which helps to ensure plant roots are not deprived of oxygen – a common effect caused when water sits on top of the soil.
Using a potting mix that’s full of nutrients and minerals helps plants to better absorb them. Something to consider when using potting mixes though is they tend to dry out more rapidly than regular soil, so they may require more frequent watering.
To account for this at seeding time, you can soak the soil in a bucket of water, so it retains more water and is easier to work with when you begin to seed.
Step 7: Choose Between Seeds or Seedlings
You’ve come a long way; you’re ready to get started in planting your herbs by either seeding your own plants or beginning with seedlings you can get from any gardening store. Before you decide whether to start from scratch or a small seedling, consider these two questions:
- Does the plant transplant well?
- Are you looking for mature growth in a short timeframe?
If your answers are yes to both, you can begin with a seedling. If not, stick to seeding your edible plants yourself, and then consider some best practices for seeding from Purdue University’s Department of Horticulture:
- Fill your pot (or other containers) with approximately ¾ of your already pre-wet, potting soil.
- Level out and gently press your soil’s surface. Make sure not to press too firmly since doing so can lead to poor aeration.
- Set rows, of about 1-2 inches apart, for your seeds.
- Sow your seeds uniformly and thinly in the different rows, ensuring not to overseed.
- Cover seeds, other than those that are very fine like petunia seeds, for example, with moss or smart soil. Spray a light mist of water on top of your soil for a little moisture or put in a pan of warm water to absorb from the bottom of the container (if possible).
Step 8: Mark Your Plants According to Feed Instructions
A small but critical step in the process of starting your indoor garden is marking your plant(s) with what it is when you planted it and how often to water and/or feed. This will help you create a system that is manageable to care for all your plants and to help you gauge each plant’s individual growth and troubleshoot when there are issues with growth.
Step 9: Mulch It Up to Maintain Moisture and Temperature
Besides having aesthetic appeal, mulch helps keep soils at even temperatures and prevents the loss of water that happens through evaporation. Get in the habit of covering all your growing plants in your indoor vegetable garden in mulch to keep them healthy and growing strong.
Step 10: Harvest and Transplant as Necessary
Once your plants have produced ripe and delicious produce or have grown large enough to clip, you’re ready to harvest. No doubt, this will come at different times for different plants, but be sure to keep an eye on them to ensure you catch when they need to be transplanted or switched to another, larger container.
Some plants grow very shallow roots, and some grow deep roots. When you’re ready to transplant something, moisten it with transplant fertilizer one to two days prior to moving it.
Then, repeat steps 5 and 6 above – using a container one size larger than the one you’ve had the plant in and carving out a hole in the potting soil for your plant to fit in nicely.
I can bet that once you start seeing your vegetables, fruits, and herbs produce, you’ll be hooked on your blooming indoor garden. Personally, I’ve found gardening, whether indoors or out, to be one of the most therapeutic tasks; touching and caring for Mother Earth are rewarding in many ways that even a person with only a little “green thumb” will enjoy.
You May Also Like…

Editor’s Note: This post was originally published on July 4, 2015, and has been updated for quality and relevancy.